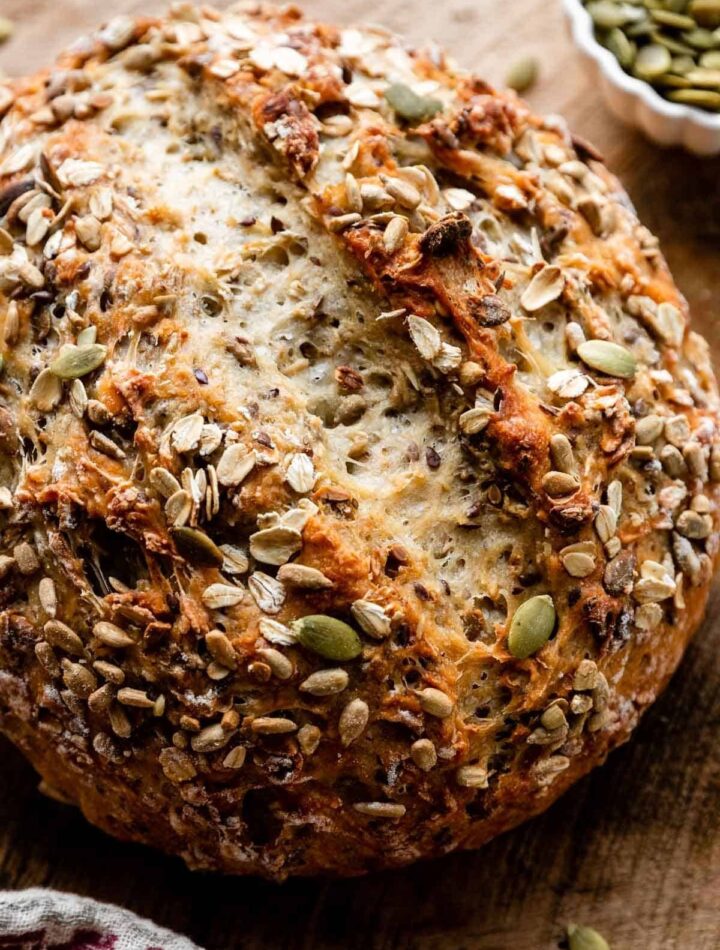
Homemade No-Knead Gluten-Free Bread is a wonderful option for anyone who wants fresh bread without the effort of kneading dough. Traditional bread relies on gluten to develop structure and elasticity, but this recipe uses a carefully balanced combination of gluten-free flour, xanthan gum, and proper hydration to create a loaf that is soft, flavorful, and satisfying. The result is a bread with a tender crumb, a lightly crisp crust, and a texture that works beautifully for sandwiches, toast, and everyday meals.
This recipe is designed to be simple enough for beginners while producing bakery-quality results. Since there is no kneading required, the process is easier and less time-consuming than many traditional bread recipes.
Why You’ll Love This Recipe
- Completely gluten-free
- No kneading required
- Soft interior with a golden crust
- Easy for beginner bakers
- Excellent for sandwiches and toast
- Freezes well
- Made with simple ingredients
Ingredients
Makes 1 standard loaf
Dry Ingredients
- 3 cups (420 g) gluten-free all-purpose flour blend
- 1 tablespoon xanthan gum (omit if included in flour blend)
- 1 teaspoon salt
- 1 tablespoon sugar
- 2¼ teaspoons (1 packet) instant yeast
Wet Ingredients
- 1½ cups (360 ml) warm water
- 2 tablespoons olive oil
- 2 large eggs, room temperature
- 1 teaspoon apple cider vinegar
Optional Toppings
- Sesame seeds
- Poppy seeds
- Oats certified gluten-free
- Sunflower seeds
Equipment Needed
- Large mixing bowl
- Wooden spoon or spatula
- Standard loaf pan (9 x 5 inches)
- Plastic wrap or clean kitchen towel
- Cooling rack
Preparation Time
- Preparation: 15 minutes
- Rising Time: 45–60 minutes
- Baking Time: 45–50 minutes
- Total Time: Approximately 2 hours
Step 1: Prepare the Loaf Pan
Lightly grease a standard loaf pan with oil or nonstick spray.
You may also line the pan with parchment paper for easier removal.
Set the pan aside while preparing the dough.
Proper preparation prevents sticking and helps maintain the loaf’s shape.
Step 2: Mix the Dry Ingredients
In a large mixing bowl, combine:
- Gluten-free flour blend
- Xanthan gum (if needed)
- Salt
- Sugar
- Instant yeast
Whisk thoroughly until evenly combined.
This step ensures that the yeast and other ingredients are distributed evenly throughout the flour mixture.
Step 3: Combine the Wet Ingredients
In a separate bowl, whisk together:
- Warm water
- Olive oil
- Eggs
- Apple cider vinegar
The water should be warm, approximately 38–43°C (100–110°F).
Water that is too hot may damage the yeast, while cold water may slow the rising process.
Step 4: Form the Dough
Pour the wet ingredients into the bowl containing the dry ingredients.
Using a wooden spoon or sturdy spatula, mix until a thick batter-like dough forms.
Unlike traditional bread dough, gluten-free dough is generally softer and stickier.
There is no need to knead.
Continue mixing until no dry flour remains.
The dough should be smooth, thick, and slightly sticky.
Step 5: Transfer to the Loaf Pan
Spoon the dough into the prepared loaf pan.
Use a spatula dipped in water to smooth the top.
If desired, sprinkle the surface with seeds or gluten-free oats.
The dough should fill the pan evenly.
A smooth top helps create a more attractive finished loaf.
Step 6: Allow the Dough to Rise
Cover the loaf pan loosely with plastic wrap or a clean kitchen towel.
Place it in a warm, draft-free location.
Allow the dough to rise for 45–60 minutes.
The dough should increase noticeably in size and rise close to the top of the pan.
Unlike wheat bread, gluten-free dough usually rises only once before baking.
Avoid over-proofing, as excessive rising may cause the loaf to collapse during baking.
Step 7: Preheat the Oven
While the dough is rising, preheat your oven to 375°F (190°C).
A properly preheated oven helps the bread rise evenly and develop a beautiful crust.
Position the oven rack in the center of the oven.
Step 8: Bake the Bread
Place the loaf pan in the preheated oven.
Bake for 45–50 minutes.
The bread should develop a golden-brown crust.
The loaf is fully baked when:
- The top is firm.
- The loaf sounds hollow when tapped.
- An instant-read thermometer inserted into the center reads approximately 205°F (96°C).
If the top browns too quickly, loosely cover it with aluminum foil during the final 15 minutes of baking.
Step 9: Cool the Bread
Remove the bread from the oven.
Allow it to cool in the pan for 10 minutes.
Carefully transfer the loaf to a wire cooling rack.
Let the bread cool completely before slicing.
This step is important because gluten-free bread continues to set as it cools.
Cutting too early may result in a gummy texture.
Step 10: Slice and Serve
Once completely cooled, slice the bread using a sharp serrated knife.
Serve with:
- Butter
- Jam
- Peanut butter
- Sandwich fillings
- Soup and salad
The bread is especially delicious toasted.
Tips for Success
Use a Good Gluten-Free Flour Blend
Choose a blend specifically formulated for bread baking.
Many blends contain rice flour, potato starch, and tapioca starch, which work well together.
Measure Carefully
Gluten-free baking requires accurate measurements.
Too much flour can create a dense loaf.
Don’t Skip the Xanthan Gum
Xanthan gum helps provide structure and elasticity.
Without it, the bread may crumble.
Use Warm Ingredients
Warm liquids help activate the yeast and encourage proper rising.
Allow Complete Cooling
Patience during cooling greatly improves the texture.
Flavor Variations
Herb Bread
Add:
- 1 teaspoon dried rosemary
- 1 teaspoon thyme
- ½ teaspoon garlic powder
Cheese Bread
Mix in:
- 1 cup shredded cheddar cheese
Seeded Bread
Add:
- Pumpkin seeds
- Sunflower seeds
- Sesame seeds
Cinnamon Raisin Bread
Add:
- 1 teaspoon cinnamon
- ¾ cup raisins
Honey Oat Bread
Replace the sugar with honey and add gluten-free oats.
Storage Instructions
Store bread in an airtight container at room temperature for up to 3 days.
For longer storage:
- Refrigerate for up to 1 week.
- Freeze for up to 3 months.
To freeze, slice the loaf before freezing.
This allows individual slices to be removed as needed.
Common Mistakes to Avoid
Using Cold Water
Cold water slows yeast activity and can reduce rising.
Over-Proofing
Allowing the dough to rise too long may cause collapse during baking.
Cutting While Hot
Warm bread may appear gummy if sliced too soon.
Underbaking
Always ensure the center reaches the proper internal temperature.
Nutritional Benefits
Depending on the flour blend used, gluten-free bread may provide:
- Dietary fiber
- Iron
- B vitamins
- Complex carbohydrates
Adding seeds can further increase nutritional value.
Frequently Asked Questions
Can I Make This Dairy-Free?
Yes. This recipe is naturally dairy-free if you avoid cheese additions.
Can I Use Active Dry Yeast?
Yes. Dissolve it in the warm water with the sugar before mixing.
Why Is My Bread Dense?
Common causes include insufficient rising, inaccurate measurements, or expired yeast.
Can I Make Rolls Instead of a Loaf?
Yes. Divide the dough into a muffin pan or individual portions and reduce baking time.
Conclusion
This No-Knead Gluten-Free Bread recipe proves that making delicious homemade gluten-free bread does not have to be difficult. With simple ingredients, no kneading, and a straightforward process, you can create a loaf that is soft, flavorful, and perfect for everyday use. Whether toasted for breakfast, used for sandwiches at lunch, or served alongside dinner, this bread offers all the comfort and satisfaction of traditional homemade bread while remaining completely gluten-free. Once you experience the aroma and taste of freshly baked gluten-free bread from your own kitchen, it is likely to become a staple recipe in your baking collection.