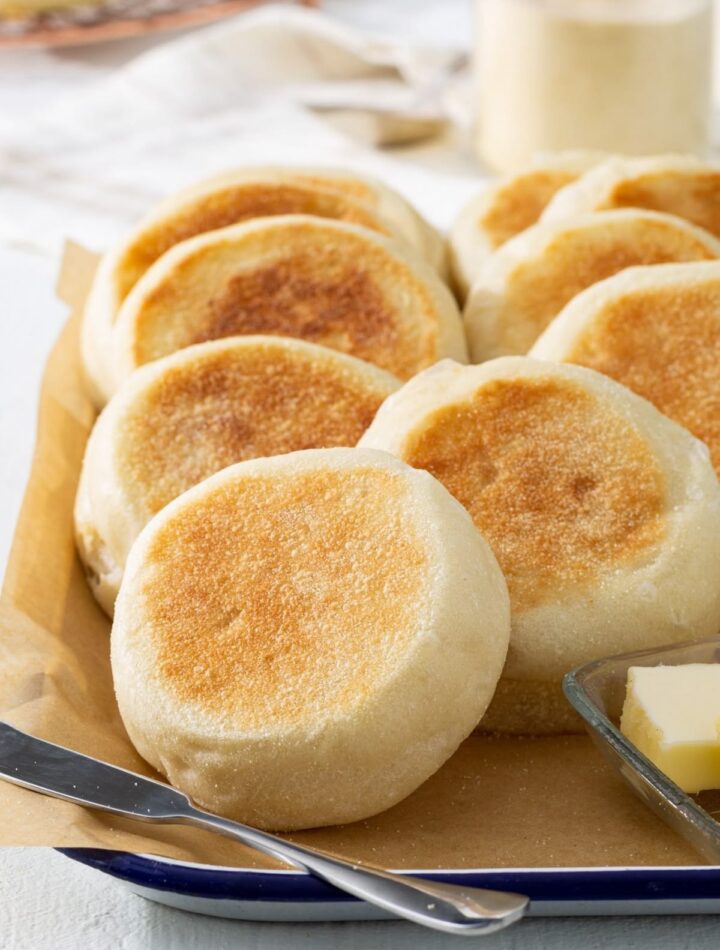
English muffins are soft, round, yeast-leavened breads with a lightly crisp exterior and a distinctive interior full of tiny holes and pockets. These delicious muffins are traditionally cooked on a griddle rather than baked, giving them their unique texture and flavor. Perfect for breakfast, brunch, or snacks, English muffins can be served with butter and jam, used in breakfast sandwiches, or topped with eggs and cheese. Making them at home requires a little patience, but the results are well worth the effort.
Ingredients
Makes 10–12 English muffins
For the Dough
- 3 cups (375 g) all-purpose flour
- 1 tablespoon sugar
- 1 teaspoon salt
- 2¼ teaspoons (1 packet) active dry yeast
- 1 cup (240 ml) warm milk
- 2 tablespoons unsalted butter, melted
- 1 large egg
- 2–3 tablespoons warm water, if needed
For Dusting
- ½ cup cornmeal or semolina flour
For Cooking
- 1 tablespoon butter or oil for greasing the griddle
Equipment Needed
- Large mixing bowl
- Measuring cups and spoons
- Wooden spoon or dough hook
- Rolling pin
- Round biscuit cutter (about 3 inches)
- Baking sheet or tray
- Clean kitchen towel
- Large skillet, griddle, or non-stick pan
- Spatula
Preparation Time
- Preparation: 25 minutes
- Rising Time: 1½–2 hours
- Cooking Time: 20–25 minutes
- Total Time: Approximately 3 hours
Step 1: Activate the Yeast
Pour the warm milk into a large mixing bowl. The milk should be warm but not hot, around 38–43°C (100–110°F). Add the sugar and yeast, then stir gently.
Let the mixture sit for 5–10 minutes until it becomes foamy. This indicates that the yeast is active and ready to use.
Step 2: Prepare the Dough
Add the melted butter, egg, and salt to the yeast mixture. Stir until combined.
Gradually add the flour, one cup at a time, mixing continuously. The dough should begin to come together into a soft mass. If it seems too dry, add a tablespoon of warm water at a time until the dough is soft and slightly sticky.
Transfer the dough to a lightly floured surface and knead for 8–10 minutes. The dough should become smooth, elastic, and soft. If using a stand mixer, knead with a dough hook for about 5–6 minutes.
Step 3: First Rise
Place the dough in a lightly greased bowl and turn it once so all sides are coated.
Cover the bowl with a clean kitchen towel or plastic wrap. Let the dough rise in a warm place for about 1 to 1½ hours, or until it doubles in size.
The rising process allows the yeast to create air pockets that contribute to the muffin’s signature texture.
Step 4: Shape the Muffins
Once the dough has doubled, gently punch it down to release excess air.
Turn the dough onto a lightly floured work surface. Roll it out to approximately ½ inch thickness.
Using a round biscuit cutter or drinking glass, cut out circles of dough. Gather the scraps and re-roll them to cut additional muffins.
Sprinkle a baking sheet generously with cornmeal. Place the dough rounds on the prepared sheet and sprinkle more cornmeal over the tops.
The cornmeal prevents sticking and gives English muffins their traditional appearance and texture.
Step 5: Second Rise
Cover the dough rounds loosely with a kitchen towel.
Allow them to rise for another 30–45 minutes. During this time they will become slightly puffy and airy.
Avoid over-proofing, as overly risen muffins may collapse during cooking.
Step 6: Prepare the Griddle
Heat a large skillet or griddle over low to medium-low heat.
Grease the surface lightly with butter or oil. The temperature should be moderate enough to cook the muffins slowly without burning the outside before the center is fully cooked.
A slow cooking process is key to achieving evenly cooked English muffins.
Step 7: Cook the Muffins
Carefully place several dough rounds onto the heated griddle, leaving enough space between them.
Cook for about 7–8 minutes on the first side. The bottoms should become golden brown.
Flip the muffins gently and cook the second side for another 7–8 minutes.
Continue turning occasionally if needed to ensure even browning and thorough cooking.
The internal temperature should reach approximately 93°C (200°F) when fully cooked.
Repeat with the remaining dough rounds.
Step 8: Cool Completely
Transfer the cooked English muffins to a wire rack.
Allow them to cool completely before slicing. Cooling helps set the crumb structure and prevents the interior from becoming gummy.
Step 9: Split the Muffins Properly
For the classic English muffin texture, use a fork rather than a knife to split them.
Insert the fork around the middle edge of the muffin, creating small punctures all the way around. Then gently pull the halves apart.
This method preserves the famous nooks and crannies that hold melted butter and spreads.
Serving Suggestions
English muffins are incredibly versatile and can be served in many ways:
Traditional Breakfast
Toast and spread with:
- Butter
- Strawberry jam
- Orange marmalade
- Honey
- Peanut butter
Breakfast Sandwich
Fill with:
- Fried egg
- Cheese
- Crispy bacon
- Sausage patty
- Avocado slices
Eggs Benedict
Top toasted muffin halves with:
- Canadian bacon or ham
- Poached eggs
- Hollandaise sauce
Sweet Variations
Serve with:
- Nutella
- Fresh berries
- Whipped cream cheese
- Cinnamon butter
Tips for Success
Use Fresh Yeast
Always check the expiration date on your yeast. Fresh yeast provides better rising power and flavor.
Maintain Low Heat
Cooking too quickly can result in muffins that are dark on the outside but undercooked inside.
Don’t Rush the Rising Time
Proper fermentation develops both flavor and texture.
Use a Fork to Split
The fork-splitting method creates the characteristic holes that make English muffins unique.
Freeze for Later
English muffins freeze exceptionally well. Once cooled, place them in airtight freezer bags and freeze for up to 3 months.
Flavor Variations
Whole Wheat English Muffins
Replace half of the all-purpose flour with whole wheat flour for a heartier texture and nutty flavor.
Cinnamon Raisin Muffins
Add 1 teaspoon cinnamon and ¾ cup raisins to the dough.
Cheese English Muffins
Mix 1 cup shredded cheddar cheese into the dough before kneading.
Herb English Muffins
Add dried rosemary, thyme, or oregano for a savory version.
Storage Instructions
Store English muffins in an airtight container at room temperature for up to 3 days.
For longer storage, refrigerate them for up to one week or freeze them for several months.
To refresh stored muffins, toast them before serving.
Why Homemade English Muffins Are Special
Store-bought English muffins are convenient, but homemade versions offer superior flavor, texture, and freshness. The slow rise develops a rich yeasty taste, while griddle cooking creates a perfectly balanced crust. Homemade muffins also allow complete control over ingredients, making them ideal for customization.
The satisfaction of pulling apart a freshly made English muffin and seeing the airy interior filled with tiny pockets is one of the rewards of baking from scratch.
Conclusion
Homemade English muffins are a rewarding baking project that produces delicious results. With a soft interior, golden crust, and classic nooks and crannies, they are perfect for breakfast, brunch, or anytime snacking. By following the steps of mixing, kneading, rising, shaping, and griddle-cooking, you can create bakery-quality English muffins in your own kitchen. Serve them warm with butter and jam, transform them into breakfast sandwiches, or use them as the base for elegant brunch dishes. Once you taste freshly made English muffins, they may become a regular favorite in your home baking routine.