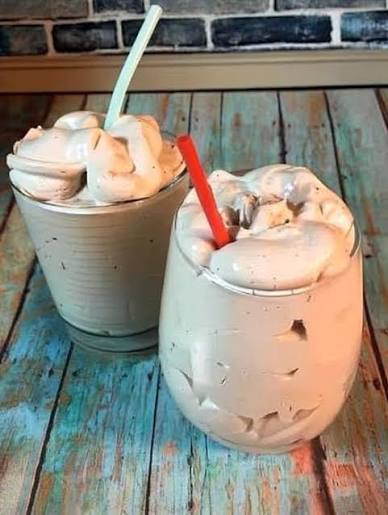
There are few frozen desserts as nostalgic and satisfying as a thick, creamy Chocolate Frosty. It has that perfect consistency somewhere between a traditional milkshake and soft-serve ice cream—cold, smooth, rich, and chocolatey without being overwhelmingly heavy.
The best part? You don’t need an ice cream maker or any special equipment to make one at home.
This easy homemade Chocolate Frosty starts with creamy vanilla ice cream and transforms it into a delicious chocolate frozen treat with unsweetened cocoa powder, whole milk, sugar, salt, and a small amount of optional instant coffee.
Instead of simply blending the ingredients into a regular milkshake, this recipe uses a simple freeze–stir–freeze method. The mixture is partially frozen, stirred to break up developing ice crystals, and then frozen again. This helps create the thick, spoonable texture that makes a frosty so special.
🍫 Why You’ll Love This Homemade Chocolate Frosty
- Creamy and thick
- Rich chocolate flavor without being overly intense
- No ice cream maker required
- Uses simple ingredients
- Easy to prepare
- Perfectly balanced sweetness
- Thick enough to enjoy with a spoon
- Soft enough to drink through a wide straw
- Great for an easy homemade dessert
🛒 Ingredients
For the Chocolate Frosty
- 2 cups high-quality vanilla ice cream, slightly softened
- ½ cup cold whole milk
- 2 tablespoons unsweetened cocoa powder
- 1 tablespoon granulated sugar
- ¼ teaspoon instant coffee granules, optional
- Tiny pinch of salt
Why These Ingredients Work
Vanilla ice cream: Provides the creamy, rich foundation for the frosty.
Whole milk: Loosens the ice cream mixture while helping maintain a thick final consistency.
Unsweetened cocoa powder: Provides the chocolate flavor without adding additional sweetness.
Granulated sugar: Balances the natural bitterness of cocoa and gives the dessert a pleasantly sweet flavor.
Instant coffee: Optional, but a tiny amount can intensify the chocolate flavor without making the dessert taste like coffee.
Salt: A very small pinch helps enhance the chocolate and vanilla flavors and balance the sweetness.
👨🍳 How to Make a Chocolate Frosty
Step 1: Soften the Ice Cream
Remove the vanilla ice cream from the freezer and let it sit at room temperature for approximately 5–7 minutes.
You want the ice cream to become soft enough to stir easily, but it should still remain thick.
Do not allow the ice cream to completely melt.
💡 Tip: If your kitchen is warm, check the ice cream after a few minutes so it doesn’t become too liquid.
Step 2: Make the Chocolate Base
In a medium bowl, combine:
- 2 tablespoons unsweetened cocoa powder
- 1 tablespoon granulated sugar
- ¼ teaspoon instant coffee, if using
- A tiny pinch of salt
Add a small amount of the cold whole milk.
Whisk everything together until it forms a smooth chocolate paste.
This step helps prevent the cocoa powder from forming lumps when the remaining milk is added.
Step 3: Add the Remaining Milk
Slowly add the remaining whole milk while whisking continuously.
Continue whisking until the mixture becomes smooth and evenly combined.
You should have a smooth, chocolate-colored liquid with no visible cocoa lumps.
Step 4: Combine With the Ice Cream
Add the chocolate mixture to the slightly softened vanilla ice cream.
Stir thoroughly until the ice cream and chocolate mixture are completely combined.
You can briefly blend the mixture if you want an especially smooth consistency, but avoid overmixing.
At this stage, the mixture will still be relatively soft. That’s completely normal—the freezer will create the final frosty texture.
Step 5: First Freezing Stage
Pour the mixture into a freezer-safe container.
Spread it evenly and place it in the freezer for approximately 1 hour.
During this first freezing stage, the mixture will begin to firm up, with the edges usually freezing faster than the center.
Step 6: Stir the Partially Frozen Mixture
After about 1 hour, remove the container from the freezer.
Use a spoon or spatula to scrape the frozen mixture from the sides and stir everything thoroughly.
Make sure the colder, firmer portions from the edges are mixed back into the softer center.
This step is important because it helps break up developing ice crystals and creates a smoother texture.
Step 7: Freeze Again
Return the container to the freezer.
Freeze for another 50–55 minutes.
Check the consistency after this second freezing stage.
The finished dessert should be thick, creamy, and spoonable without becoming completely solid.
Step 8: Serve Immediately
Once the Chocolate Frosty reaches the desired consistency, spoon it into a chilled glass or cup.
Serve immediately with a spoon and, if desired, a wide straw.
The ideal consistency should be somewhere between a thick milkshake and soft-serve ice cream.
🍫 What Makes the Texture So Creamy?
The texture is what really separates a frosty from an ordinary chocolate milkshake.
A traditional milkshake is usually thin enough to drink easily. A frosty is much thicker and can be eaten with a spoon while still remaining soft enough to sip through a wide straw.
The two-stage freezing method helps create this texture.
When the mixture first enters the freezer, ice crystals begin to develop. Stirring the mixture after about an hour disrupts these developing crystals and redistributes the frozen and unfrozen portions.
The mixture is then frozen again to finish creating its thick consistency.
This technique won’t exactly duplicate the results of a commercial frozen-dessert machine, but it is a simple and practical method for making a creamy frosty-style dessert at home.
☕ Why Add Instant Coffee?
Instant coffee is completely optional, but it can be a useful chocolate flavor enhancer.
Chocolate and coffee naturally complement each other. A very small amount of instant coffee can make the chocolate flavor taste deeper and fuller without making the dessert taste like coffee.
The recommended ¼ teaspoon should remain subtle.
If you prefer a straightforward chocolate flavor, simply leave the coffee out.
🧂 Why Does the Recipe Need Salt?
Even though this is a sweet dessert, a tiny pinch of salt can make a noticeable difference.
Salt helps balance sweetness and allows the cocoa and vanilla flavors to stand out more clearly.
You don’t want the dessert to taste salty.
The salt should simply work in the background to make the other flavors more pronounced.
🍨 Choosing the Best Vanilla Ice Cream
Because vanilla ice cream forms the base of this recipe, choosing a creamy variety can improve the final texture.
A dense, creamy ice cream generally produces a richer frosty than an extremely airy product.
Allow the ice cream to soften slightly before mixing.
Remember, softened does not mean melted.
The ice cream should be easy to stir while still retaining enough thickness to provide body to the finished dessert.
🥛 Why Use Whole Milk?
Whole milk helps loosen the ice cream and allows the cocoa mixture to blend smoothly.
Only ½ cup is needed because adding too much milk could make the finished dessert too thin.
Cold whole milk works best.
Adding the milk gradually to the cocoa mixture also makes it easier to create a smooth, lump-free chocolate base.
🍫 Why Use Unsweetened Cocoa Powder?
Unsweetened cocoa gives you greater control over the final flavor.
Since the cocoa doesn’t contain added sugar, you can balance its natural bitterness with a measured amount of granulated sugar.
A good-quality cocoa powder provides a smooth chocolate flavor without making the dessert excessively sweet.
You can also use Dutch-processed cocoa if you prefer a smoother, mellow chocolate flavor.
However, avoid adding too much cocoa. Excessive cocoa can make the frosty bitter and overpower the mild, creamy flavor.
🍬 The Role of Sugar
The vanilla ice cream already provides sweetness, so only 1 tablespoon of granulated sugar is needed.
The sugar helps soften the bitterness of the unsweetened cocoa and creates a balanced chocolate flavor.
Fine granulated sugar works especially well because it dissolves more easily into the milk.
❄️ Why You Shouldn’t Simply Freeze It Once
You might be tempted to mix everything together and place it in the freezer for two hours without stirring.
However, leaving the mixture completely undisturbed can allow larger ice crystals to develop.
Larger ice crystals can result in a rougher, icier texture.
The midway stirring step helps break up those developing crystals and creates a more consistent frozen dessert.
This is one of the most important techniques in this easy homemade Chocolate Frosty.
🌟 How to Know When It’s Ready
The perfect Chocolate Frosty should be:
- Thick enough to scoop
- Soft enough to stir
- Firm enough to hold its shape
- Smooth rather than icy
- Creamy rather than hard
- Easy to eat with a spoon
- Soft enough for a wide straw
If it is completely solid, it may have been frozen for too long.
If it is still very liquid, continue freezing it in short intervals until the desired consistency is reached.
💡 Remember: Every freezer is slightly different, so freezing times are approximate.
🍟 Serving Suggestions
For the most nostalgic experience, enjoy your Chocolate Frosty immediately after it reaches the perfect consistency.
Serve it in a chilled glass or cup with a spoon and wide straw.
For a classic sweet-and-salty combination, pair it with hot, crispy fries. The contrast between the cold, creamy chocolate dessert and salty fries makes for a delicious treat.
You can also enjoy it on its own or with your favorite chocolate toppings.
✨ Easy Variations
🍫 Extra Chocolate Frosty
If you prefer a stronger chocolate flavor, slightly increase the cocoa powder in your next batch.
Keep in mind that additional cocoa will also increase the bitterness, so adjust gradually.
🍬 Sweeter Frosty
If you prefer a sweeter dessert, increase the sugar slightly according to your taste.
☕ Mocha Frosty
For a more noticeable coffee-chocolate flavor, increase the instant coffee slightly. Start with a small amount so the coffee doesn’t overpower the chocolate.
🌱 Dairy-Free Version
For a dairy-free variation, replace the dairy-based ingredients with suitable plant-based alternatives.
The texture and flavor will change slightly, but the same freeze–stir–freeze technique can still be used.
💪 Protein-Focused Variation
If you want to turn this into a higher-protein frozen dessert, a protein powder can be added. Because protein powders vary considerably in sweetness and thickness, you may need to adjust the milk and sugar accordingly.
🧊 Storage
This Chocolate Frosty is best enjoyed fresh.
For the best texture, enjoy it within a few hours of preparation.
It can be stored for approximately 24 hours, although it may become firmer or develop a slightly icier texture.
If it becomes too firm, allow it to soften briefly before serving. You can also stir or briefly blend it with a small amount of milk to help restore a smoother consistency.
For the best quality, avoid storing it for longer than approximately 48 hours.
⏱️ Recipe at a Glance
Prep Time: 5 minutes
First Freeze: 1 hour
Second Freeze: 50–55 minutes
Total Time: Approximately 2 hours 5 minutes
Servings: 2 large or 4 small
Difficulty: Easy
🍫 Quick Recipe Summary
- Soften the vanilla ice cream for 5–7 minutes.
- Whisk cocoa powder, sugar, optional instant coffee, and salt with a small amount of milk.
- Add the remaining milk and whisk until smooth.
- Stir the chocolate mixture into the softened vanilla ice cream.
- Transfer to a freezer-safe container.
- Freeze for approximately 1 hour.
- Remove and thoroughly stir, scraping the frozen edges.
- Freeze again for 50–55 minutes.
- Check for a thick, creamy, spoonable consistency.
- Serve immediately.
🍫 Final Result
This homemade Creamy Chocolate Frosty delivers everything you want in a nostalgic frozen dessert: a thick and creamy texture, balanced chocolate flavor, gentle sweetness, and a consistency that falls perfectly between a milkshake and soft-serve ice cream.
With just a handful of simple ingredients and a straightforward freeze–stir–freeze technique, you can create a delicious chocolate frosty at home without an ice cream maker.
It’s cold, creamy, chocolatey, easy to prepare, and perfect whenever you’re craving a simple homemade frozen treat.